


Introduction
Ever wondered how some small businesses turn a simple shirt into a walking billboard? That’s the magic of screen printing. After years of working with local shops and brands, I’ve learned that the right printing approach can make or break your product line. The good news is, you don’t need fancy tools or a huge budget to start. In this guide, I’ll share real secrets that help small businesses print smarter, save money, and create designs customers actually want to wear.
Screen Printing Secrets for Small Business Success
Every small business deserves a printing method that is simple, reliable, and profitable. Screen printing, when done right, can save money, boost brand recognition, and create products that customers keep coming back for.
Many owners now choose an all in one screen printing machine because it combines ease of use with professional results. These secrets are designed to help small business owners and DIY printers get consistent outcomes without wasting time or resources.
Why Screen Printing Wins for Small Business Branding
When it comes to custom printing, screen printing still beats newer methods like direct-to-garment (DTG) or heat transfers. Why? Because it delivers bold, durable designs that survive countless washes.
Once your screens are ready, the cost per print keeps dropping with every shirt, making it perfect for bulk orders. DTG and heat transfer work fine for short runs, but screen printing shines when businesses want rich colors, lasting quality, and higher profit margins.
For even better results, follow these pro tips for screen printing to get the most value out of every project.

Essential Equipment & Shop Layout to Save Time and Money
Core Gear You Actually Need First
Start with the basics: a press, screens, squeegees, an exposure unit, and a dryer. These essentials cover everything you need to print clean and professional designs.
Smart Shop Layout for Smooth Workflow
Arrange your space so each step flows naturally—from preparing screens to final packing. A good layout saves time, cuts mistakes, and keeps work moving smoothly.
Starter Kit vs. Used Equipment: Choosing Wisely
Starter kits are simple and reliable for beginners. If you buy used, check for strong frames, solid hinges, and tight mesh. Weak or worn gear can ruin your results.
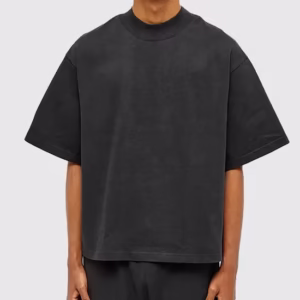
Fabric & Garment Choices for Premium, Long-Lasting Prints
Cotton vs. Blends vs. Polyester—What to Use and When
Cotton absorbs ink well and feels soft. Blends add durability and stretch. Polyester is lightweight and great for sportswear, but it often needs special inks.
Picking the Right Colorways and Garments to Reduce Returns
Choose garment colors that work well with your design and ink choices. Light prints on dark shirts or bold ink on light fabric reduce mistakes and lower returns.
Clean Prints: Resolution, Vector Files & Color Separation
300 DPI at Print Size and Vector When Possible
Always use artwork at 300 DPI or higher at the print size. Vector files work best for sharp edges and text, ensuring your designs stay crisp, clear, and professional-looking on every garment you print.
Spot Colors, Under base & Halftones for Beginners
Use spot colors for clarity. Add an under base when printing on dark garments. Keep halftones simple for smooth shading.
File Handoff Checklist for Clients to Avoid Delays
Before printing, confirm with clients: correct file size, vector or high-resolution art, colors, and layout. This saves headaches and prevents reprints.
Plastisol vs. Water-Based vs. Discharge: Ink Made Simple
When to Choose Plastisol for Consistency and Opacity
Plastisol ink is the workhorse. It delivers bright, consistent prints that pop, last, and resist fading over time.
Water-Based for Soft Hand and Eco Goals
Water-based ink feels soft and light on shirts. Many businesses choose it as an eco-friendly option customers appreciate.
Discharge Caveats on Dark Garments and Smell Considerations
Discharge ink strips dye from dark garments, leaving soft prints. The downside? It smells strong and requires good airflow in the shop.
Screens, Mesh, and Emulsion: Foundations for Sharp Prints
Mesh Count by Design Detail and Ink Type
Use low mesh (110–156) for bold designs and heavy ink. Use higher mesh (200–230) for fine lines and details.
Coating, Drying, and Exposing Screens Without Pinholes
Apply emulsion evenly, let it dry fully, and expose carefully. This prevents pinholes that ruin prints.
Test Exposure and Step Wedge Basics for Reliable Stencils
Do a quick exposure test on every batch of screens. It saves you from under- or over-exposed stencils.
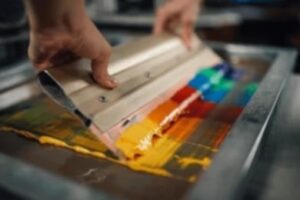
Mastering Printing: Off-Contact, Squeegee Angle & Stroke
Setting Off-Contact for Crisp Edges
Keep the screen slightly lifted from the garment. This small gap gives sharp, clean edges, ensuring each print looks professional and crisp every time.
Push vs. Pull Strokes and Pressure Control
Decide whether to push or pull with your squeegee. Stay consistent. Use steady pressure—too much smears, too little misses spots.
Flash Cure Timing to Prevent Ink Pick-Up and Fibrillation
Flash cure only until ink is tacky. Over-flashing makes ink stick to the screen, under-flashing makes it smear.
Effective Curing: Quick Tests to Prevent Wash-Outs
Time, Temperature, and Dwell Explained
Cure inks at the right heat for the right time. Too little heat and ink cracks. Too much heat and fabric shrinks.
Stretch Test and Wash Test Procedures for Quality Control
Stretch the design after curing—if it cracks, it’s not cured. Always wash a test shirt to confirm long-lasting results.
Screen Printing: Pre‑Press & Production Checklists
Pre‑Press Checklist (art, films, screens, approvals)
Before starting a screen printing job, carefully check design files for correct format, resolution, and clean vectors. Confirm sizes, fonts, and client approvals using proofs or mockups.
Inspect and clean screens for pinholes or tears, repairing them if necessary, and ensure proper screen tension and alignment for sharp, consistent prints. Mix inks correctly and test color and thickness on scrap fabric, then run a quick test print to verify color accuracy and opacity.
Production Checklist: Ink, Registration & Test Prints
Set up the squeegee with the correct blade type, angle, and pressure. Load the shirts or fabric, ensuring proper placement and pre-treating if necessary. During the run, watch the prints closely for registration and color consistency, matching each print to a proof or sample to maintain uniform quality.
Finally, cure the ink properly using a flash or dryer, then perform a wash or stretch test to ensure durability.
Post-Production: QC, Packing & Shipping
Check every garment for color accuracy, proper placement, and any printing flaws. Remove minor ink spots or fix small issues before packing. Count all items carefully to ensure they match the work order exactly.
Fold and label garments properly, using the correct box and packing slip. Attach shipping labels and notify the client with tracking information, then follow up to ensure satisfaction and encourage reviews.
FAQs
What is screen printing, and how does it work?
You can print on t-shirts, hoodies, hats, bags, and more. It works on cotton, polyester, blends, and some specialty items like jackets or aprons.
Is there a minimum order for screen printing?
Many screen printers set a minimum, usually around 12 items. Smaller runs are possible with direct-to-garment printing, sometimes even one piece.
What file formats are needed for artwork?
Vector files like AI, EPS, or PDF are best because they scale without losing quality. High-resolution images (300 DPI) also work if vectors aren’t available.
How do I choose the right ink for my project?
Plastisol inks are durable and work well on cotton. Water-based inks feel softer and are more eco-friendly. Your printer can help pick the best option.
What are common mistakes to avoid in screen printing?
Poor screen exposure can cause blurry designs, while an incorrect off-contact distance can affect print clarity. Using the wrong mesh count can also alter ink flow and reduce detail. Paying attention to these factors can save time and minimize errors.
How do I ensure quality control in my prints?
Check screen tension and alignment for sharp prints. Test ink color and thickness before full runs. Inspect cured prints to make sure they hold up in washing.
What’s the Typical Turnaround for Screen Printing Orders?
Turnaround usually takes 7–14 business days depending on size and complexity. Rush options may be available for an extra fee.
Can I provide my own garments for printing?
Some printers allow it, but the garments must meet quality standards. Always confirm with your printer before supplying your own items.
Conclusion
Screen printing isn’t just about pressing ink on fabric—it’s about creating products people love and trust. Small businesses can stand out by focusing on quality, smart workflow, and happy customers. Success comes from practicing your craft, learning from mistakes, and paying attention to every detail.
Whether you’re starting out or scaling up, these screen printing tips give you the confidence to produce great results. Keep experimenting, stay organized, and let your passion for printing show in every shirt, tote, or product you create.
